Microsoft OpenID Connect SSO
OVERVIEW
The OpenID Connect Pluto LMS authentication enables users to log in using their Microsoft account via a button on the login page.
If account creation is enabled, when a user first logs in, a new account will be created. Otherwise, they will be prompted to link it to their existing account with the same email address.

USE CASE EXAMPLE:
Scenario: XYZ Corporation uses an internal LMS to deliver training and development programs to its employees. They decide to incorporate Microsoft SSO for user authentication and access control. Implementing Microsoft SSO in a Learning Management System (LMS) for internal staff training can offer several benefits such as increased security, one login for 2 applications and a more seamless user experience between multiple applications.
Step 1: Create a Microsoft Azure App

Prerequisite:
1. You will need an Azure subscription. If you do not have one, you can create one by visiting Microsoft Azure Sign Up: http://azure.microsoft.com/en-us/pricing/free-trial/.
2. Your Organization Azure admin will need to setup this integration.
3. To use Pluto LMS with Microsoft 365 for SSO, you must configure Microsoft Azure to manage your Microsoft 365 Microsoft Azure Active Directory. A guide is available at this link: https://docs.microsoft.com/en-us/azure/active-directory/develop/quickstart-create-new-tenant.
Please note that tenant management, authorization and issues experienced with Azure itself, is out of Pluto LMS's support scope. It is advisable to leverage Microsoft support for the quickest resolution on any queries you may have with the Microsoft platform.
Please note that tenant management, authorization and issues experienced with Azure itself, is out of Pluto LMS's support scope. It is advisable to leverage Microsoft support for the quickest resolution on any queries you may have with the Microsoft platform.
The following steps are involved to create an Azure App:
1.1. Sign in to the Microsoft Azure Management Portal: https://portal.azure.com/
1.2. Click on the Azure Active Directory link from Azure services section, then App Registrations from Manage section on the left or search for “App registrations”
1.3. Click “New registration” on the top menu.
1.4. Enter a name for your application (it can be anything you want, but it should let you know this is for Pluto LMS).
1.5. Choose an option applicable to your organisation in Supported account types section. You will need to contact your IT department for this. Most common usage is “Single tenant” as shown below.

Note that the support account type will influence your authorization and token end point. More details can be found in step 3 below.
Single tenant: Used when you wish to authenticate accounts that exist in your organizational directory only (recommended for internal training)
Multitenant: Used when you wish to authenticate accounts in any organizational directory (recommended for external training to other organizations)
Multitenant: Used when you wish to authenticate accounts in any organizational directory (recommended for external training to other organizations)
1.6. In Redirect URI (optional) section, select Web and put the redirect URI from the OpenID Connect authentication plugin configuration. Ensure there is a trailing slash for this URI - i.e. https://yourlmsdomain.com/auth/oidc/
1.7. Click Register.
You now have an application registered in Azure for Pluto LMS. Move on to the next section to properly configure it.
Step 2: Configure the Azure application
2.1. Locate the App
If you followed steps above to create the Azure app, you should be redirected to the app settings page already.
Otherwise:
2.1.1. Sign in to the Microsoft Azure Management Portal.
2.1.2. Click on the Azure Active Directory link from Azure services section, then App Registrations from Manage section on the left.
2.1.3. Click on the App you created for Pluto LMS. Note you may need to change the dropdown from "My apps" to "All apps" if the App was not created by you.
2.1.4. Locate the Application ID, note this value (write it down or copy it somewhere), and set it aside. You'll need it later.
Click on the display name of the App to open its settings.
2.2. Enable implicit grant flow
2.2.1. From the menu on the left, go to Authentication link in the Manage section.
2.2.2. In the Implicit grant section, check both "Access tokens" and "ID tokens".
2.2.3. Save the changes.
2.3. Create client secrets
2.3.1. From the menu on the left, go to Certificates & secrets link in the Manage section.
2.3.2. Create a new client secret by clicking New client secret button.
2.3.3. Enter a description, and select a duration for "Expires".
2.3.4. Click Add.
2.3.5. A value will appear under Value, note this value (write it down or copy it somewhere) and set it aside. You'll need it later.
2.4. Configure App Permissions
2.4.1. Click the API permissions link in the Manage section.
2.4.2. Click Add a permission button.
2.4.3. In Select an API section, choose Microsoft APIs tab, then choose Microsoft Graph.
You will need to add the follow APPLICATION permissions:
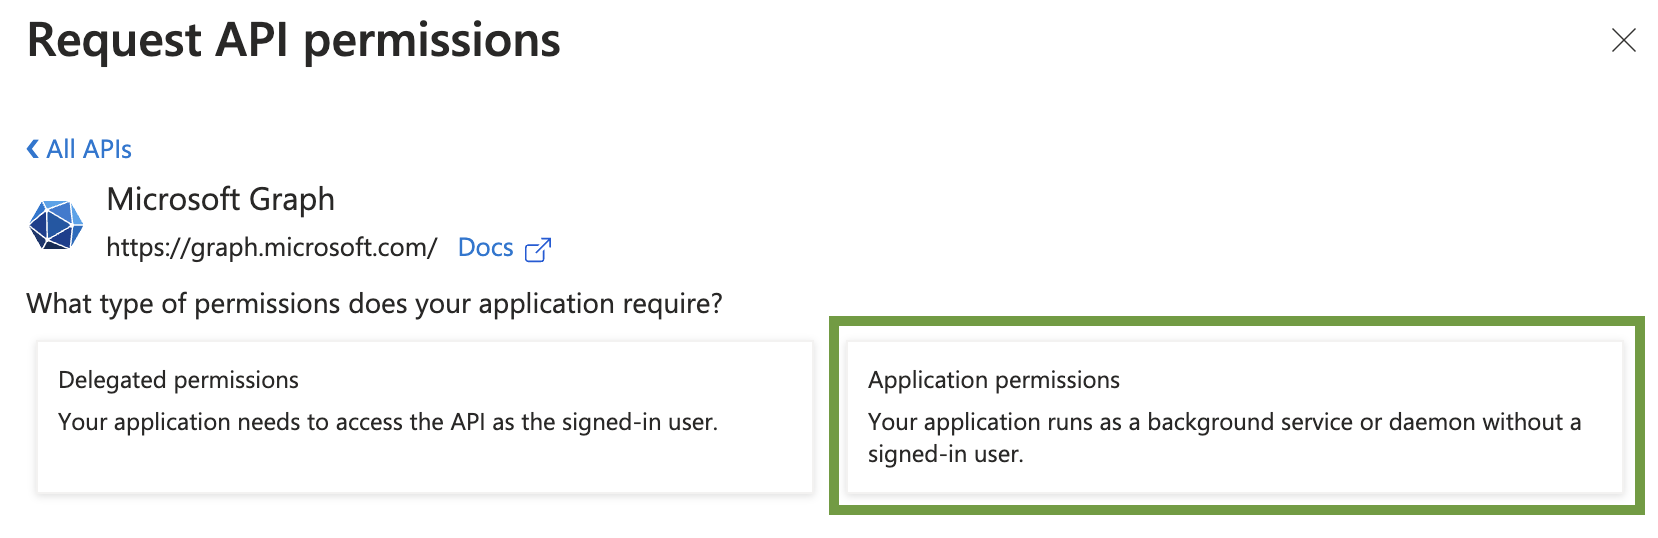
Application Permissions:
AppCatalog.Read.All
Read all app catalogs
Used to find installed Pluto LMS Teams app to be installed in Teams created for connected Pluto LMS courses.
AppRoleAssignment.ReadWrite.All
Manage app permission grants and app role assignments
Add user to the Azure app if the option in the user sync option is enabled.
Calendars.ReadWrite
Read and write calendars in all mailboxes
Required for calendar event sync.
Channel.ReadBasic.All
Read the names and descriptions of all channels
Used to find the general channel in a team to install the Pluto LMS tab in course and Teams integration.
Directory.ReadWrite.All
Read and write directory data
A common permission used in integration configuration, user sync and course sync.
Directory.Read.All
Read directory data
A common permission used in integration configuration, user sync and course sync.
EduRoster.ReadWrite.All
Read and write the organization's roster
Required in SDS sync and course sync in tenants with education license.
Files.ReadWrite.All
Read and write files in all site collections
Required for the Microsoft 365 repository to access, download, and upload files to OneDrive.
Group.ReadWrite.All
Read and write all groups
Required in the integration between Pluto LMS courses and Teams.
MailboxSettings.Read
Read all user mailbox settings
Required for syncing Outlook default timezone settings of the user.
Member.Read.Hidden
Read all hidden memberships
Required in the SDS sync feature to get school class members.
Notes.ReadWrite.All
Read and write all OneNote notebooks
Required for the OneNote integration to create notebooks, sections, and pages for assignments.
Sites.Read.All
Read items in all site collections
Required to detect OneDrive for Business URL setting.
Team.Create
Create teams
Required for creating Teams for Pluto LMS courses.
TeamMember.ReadWrite.All
Add and remove members from all teams
Required for syncing Pluto LMS course users to Teams.
TeamsAppInstallation.ReadWriteForTeam.All
Manage Teams apps for all teams
Required to install Pluto LMS Teams app to Teams created from Pluto LMS courses.
TeamSettings.ReadWrite.All
Read and change all teams' settings
Required in the integration between Pluto LMS courses and Teams.
TeamsTab.Create
Create tabs in Microsoft Teams.
Required to create a Pluto LMS tab in the Teams created from Pluto LMS courses.
User.Read.All
Read all users' full profiles
Required for SSO and to sync user information between Microsoft 365 and Pluto LMS.
You will need to add the following DELEGATE permissions:
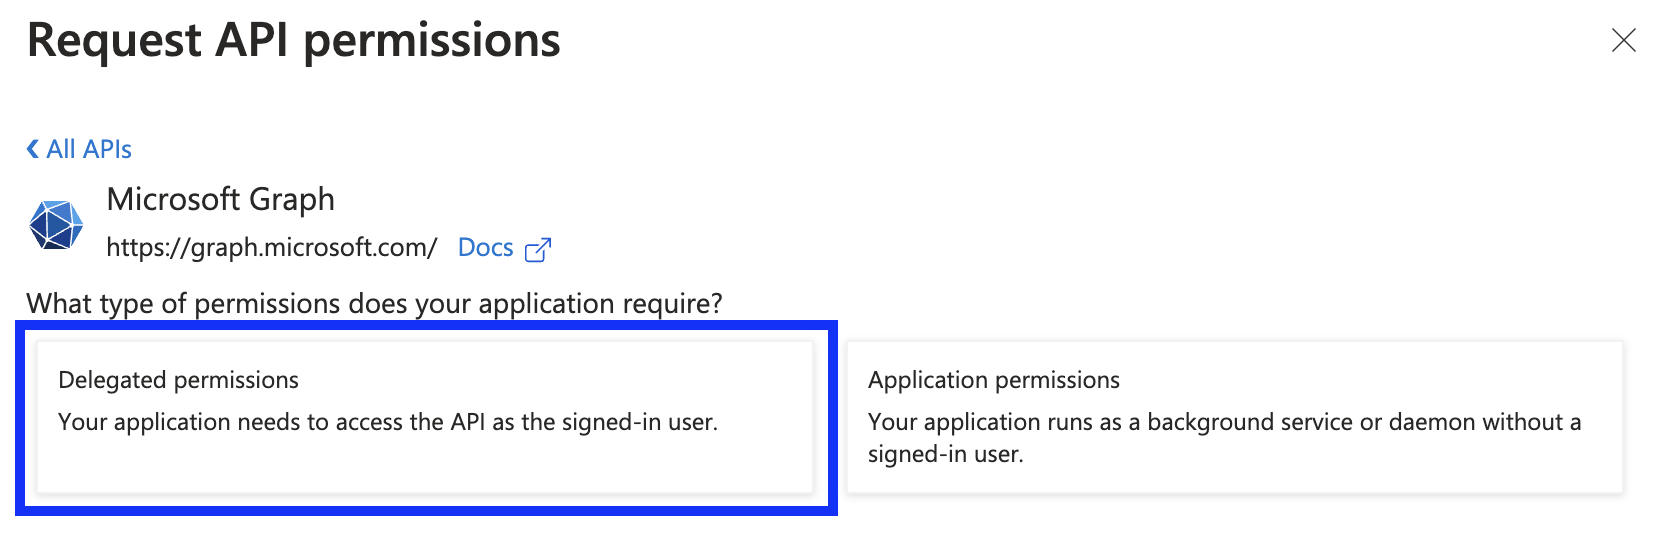
Delegated Permissions
Calendars.ReadWrite
Have full access to user calendars
Required for calendar event sync.
Files.ReadWrite.All
Have full access to all files user can access
Required for the Microsoft 365 repository to access, download, and upload files to OneDrive.
Group.ReadWrite.All
Read and write all groups
Required for course group integration.
Notes.ReadWrite.All
Read and write all OneNote notebooks that user can access
Required for the OneNote integration to create notebooks, sections, and pages for assignments.
User.Read.All
Read all users' full profiles
Required for SSO and to sync user information between Microsoft 365 and Pluto LMS.
Domain.Read.All
Read domains
Required to gather the domain names for both the hosting and additional tenants. This is especially required for configuring multi tenant.
openid
Sign users in
Required for Teams SSO.
offline_access
Maintain access to data you have given it access to
Required for Teams SSO.
email
View users' email address
Required for Teams SSO.
profile
View users' basic profile
Required for Teams SSO.
Click Add permissions at bottom of the page to add the permissions.

Important: After all the permissions are added, click the Grant admin consent for YOUR ORGANISATION NAME link.
Step 3: Add Azure Application details to Pluto LMS
3.1. Navigate to the OpenID Connect authentication settings page (Site Admin > Integrations > Single Sign On > OpenID Connect)
3.2. Click on “IdP and Authentication”
3.3. Select “Microsoft identity platform (v2.0)” for the Identity Provider (IdP) Type.

3.4. Enter the Application ID value you noted in Step 2 above from Azure into the Application ID box on the screen.
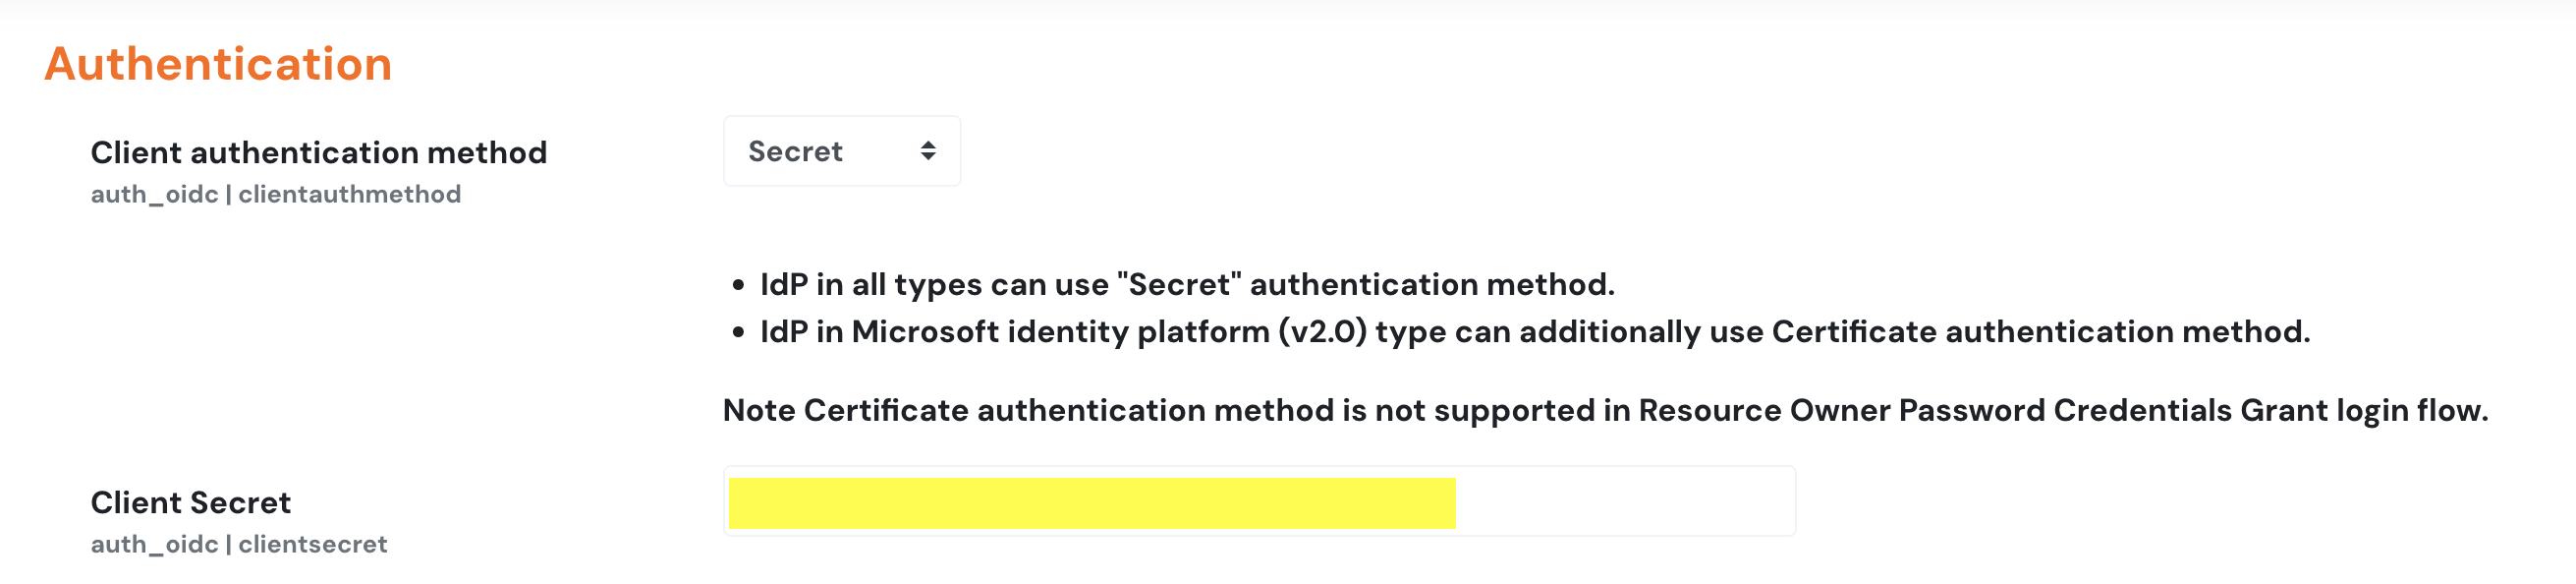
3.5. Ensure that the Client authentication method is set to "Secret" and enter the Key value you noted Step 2 above from Azure into the "Client Secret" box on the screen as shown below:
3.6. Set the Authorization Endpoint:
| Support Type | Authorization Endpoint |
Single Tenant | https://login.microsoftonline.com/{your-tenant-id}/oauth2/v2.0/authorize |
Multitenant | https://login.microsoftonline.com/common/oauth2/v2.0/authorize |
Note that your tenant ID can be found in Microsoft Entra ID as seen below:
3.7. Set the Token Endpoint:
| Support Type | Authorization Endpoint |
| Single Tenant | https://login.microsoftonline.com/{your-tenant-id}/oauth2/v2.0/token |
| Multitenant | https://login.microsoftonline.com/common/oauth2/v2.0/token |
3.8. Click "Save changes" at the bottom of the screen.

Step 4: Activate SSO
Contact support@plutolms.com to activate your SSO login button which will be located on the home page as well as login page of your LMS instance.
Step 5: Check your SSO connection
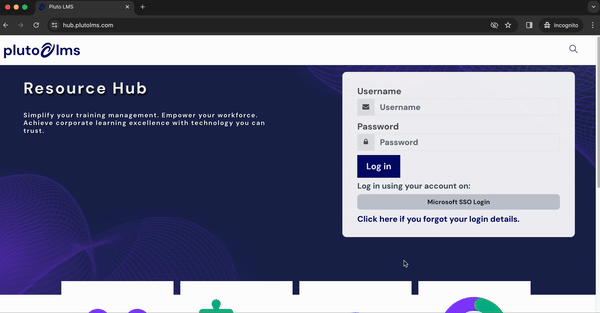
You can now login using your Microsoft credential as seen below:
Related Articles
Custom OAuth2
OVERVIEW Pluto LMS , supports OAuth2 for integrating with external services and enabling Single Sign-On (SSO) capabilities. Here's a short overview of how custom OAuth2 is used. Custom OAuth2 integration in PLuto LMS enables educational institutions ...Microsoft Teams Setup
OVERVIEW This guide will help you to setup Microsoft Teams on your LMS. USE CASE EXAMPLE: New Product Training for Sales Team Background: A company has developed a new product and needs to train its sales team on its features, benefits, and how to ...Single Sign On
OVERVIEW Single sign-on (SSO) in a Learning Management System (LMS) for internal staff training is a streamlined authentication process that enables users to access the LMS and other related systems and applications with a single set of login ...Google OAuth2 Setup
OVERVIEW Google OAuth is commonly used in Pluto LMS to provide secure and convenient authentication and authorization for users. By integrating Google OAuth into an LMS, institutions can simplify user registration and login processes, enhance ...Facebook OAuth2
OVERVIEW OAuth 2 Facebook login is used to simplify the login for users who are used to logging into facebook. Login in with a OAuth2 authentication means that you can login with your facebook credentials. USE CASE EXAMPLE: Facebook OAuth2 can be ...